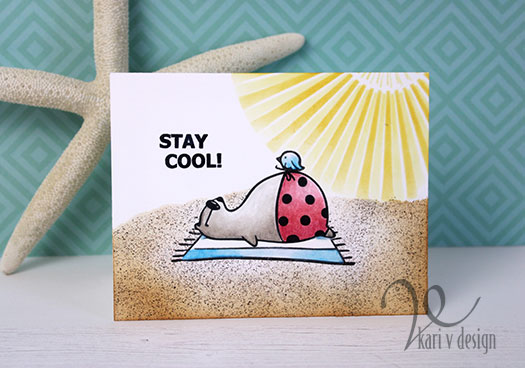
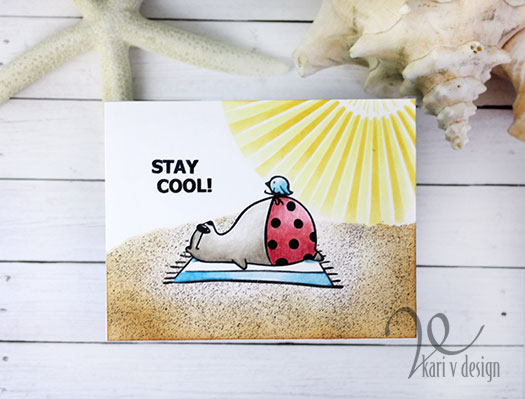
Hello! Today it was 120 degrees (Farenheit) here in Arizona, and I really wish I was at the beach! So I decided to share a simple beach card I created with a VIDEO. This is a card I created a while ago, but have never shared the video on my channel.
Wishing I was on that beach right now!
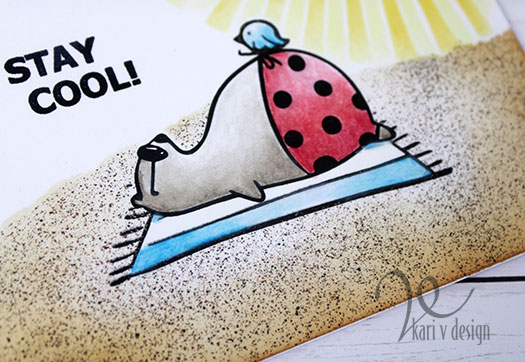
Doesn’t Big Bear look so happy on the beach?!
I hope you enjoy!
Look at that sandy beach! This technique is STILL a favorite way to create realistic sand granules for a beach scene. Check it out and let me know if you’ve tried it before?
Looks like real sand granules!
I also share a colored pencil technique to get a smooth blend. This is another favorite technique when I am using colored pencils.
I’m often asked what supplies I’ve used, so I created a list for you here, using affiliate links when possible. When you purchase using these links, I may receive a small commission. This helps me keep up with blog costs and continue to bring you fun projects like this one! Thank you so much for your support!
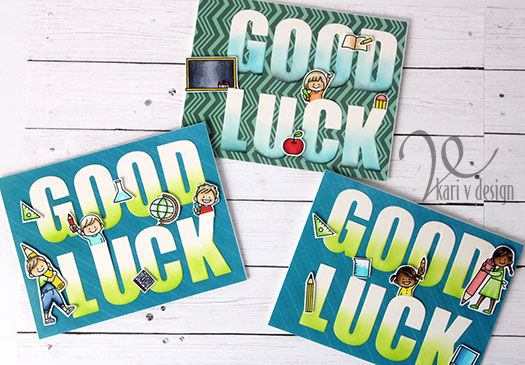
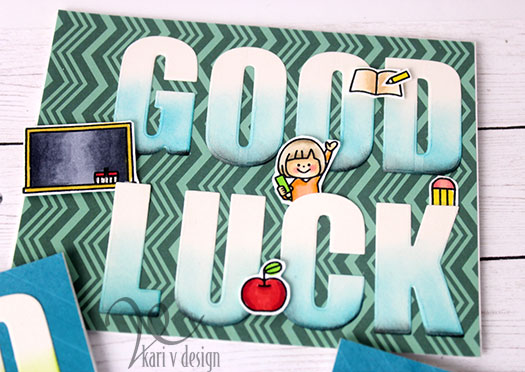
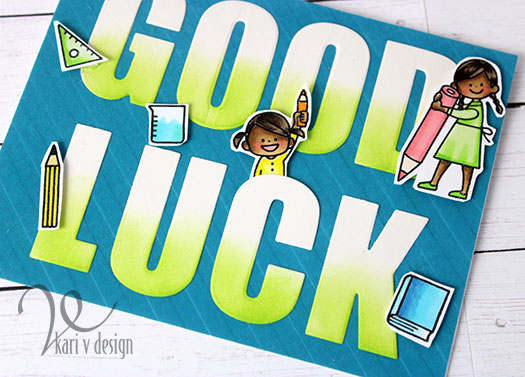
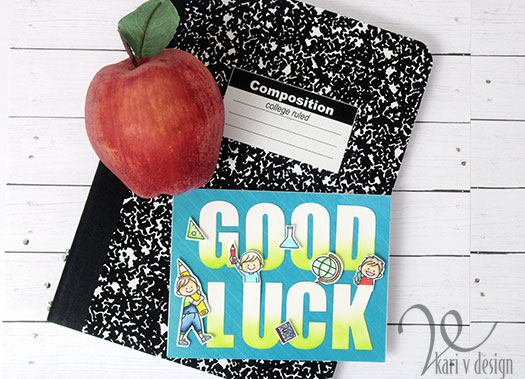
Hello! It’s Back to School week for our kiddos here and I have some quick cards to share. When I put together cards for kids, I try to remember that they are kids and really don’t care how much time or effort that goes into making a card. So that means, something quick but still cute!
Enter some stamp and die elements that are cute AND will fill the entire card.
I stamped every single image from this Waffle Flower set and colored them in quickly with my Copic markers.
Then, I die cut the large alphabet dies to spell “Good Luck” from cream colored 110# cardstock. To add some punch, I added some ink with finger daubers on the lower part of the letters.
Back to School!
I used patterned paper for the card panel to add some extra texture, and adhered the letters on with liquid glue. Then I popped up the images with foam tape.
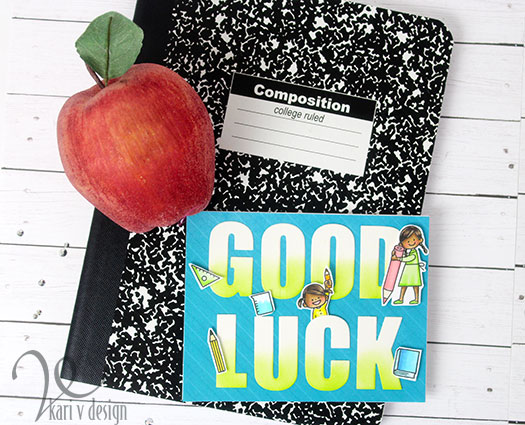
A fun card and easy to put together. I’m pretty sure my nephews and granddaughters will love them! But I think they will love the “smarties” candies that I’m giving them to go along with the card. Lol.
I’m often asked what supplies I’ve used, so I have a list below using affiliate links, when possible. When you purchase using these links, I may receive a small commission. This helps me to keep up with blog costs and continue to bring you fun projects. Thank you so much!
I hope you enjoyed these back to school cards today! If you have kids/grandkids going back to school, I wish them Good Luck!
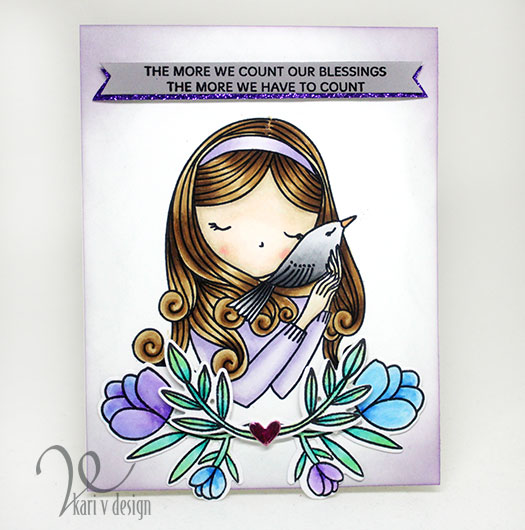
Hi Friends! You know, it’s International Women’s Day today (who knew?) and I wanted to put together a card for all my crafty friends. (I’m not sure how many crafty male friends I have out there…but maybe there’s another day I can dedicate a card to you, too *wink.)
Affiliate links are used when possible. When you click on an affiliate link in this post and purchase a product I may receive a small commission. Those really help in keeping up my blog and bringing you new projects! Thank you so very much for your support.
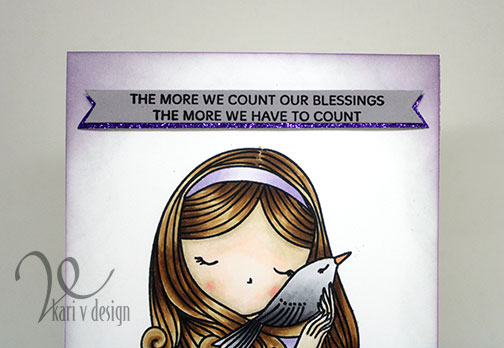
Do you know, when I count my blessings I count you TWICE! So I put together a card for you using some of my favorite products.
Counting my blessings….
Isn’t she sweet? She’s from this Waffle Flower set called “Always”. I love the matching dies for this one, it makes it so easy to make a floral swag or wreath on your card. And that sentiment is from the Simon Says Stamp “you got this” set. I love them paired together.
I used Zig Clean Color Real Brush markers on this one and I think it turned out so dreamy and fun. This image is definitely one of my favorites to color!
I popped up the sentiment AND the top set of leaves on foam tape for some fun dimension. Then I inked around the edges with Distress Oxide ink in Weathered Wood and Wilted Violet to create a dreamy look.
Isn’t she just the cutest? I hope you enjoyed this quick share with you today. Thanks for stopping by! And always, I love your comments and thumbs up!
Hello! Today was back to school for many here in Arizona. Since I don’t have any littles at home anymore, I was inspired to create a card for “Back to Creating!”
Affiliate links used when possible. When you purchase something using these links I receive a small commission, which help to pay for my blog so I can keep bringing you fun projects. Thank you for your support! I truly appreciate it.
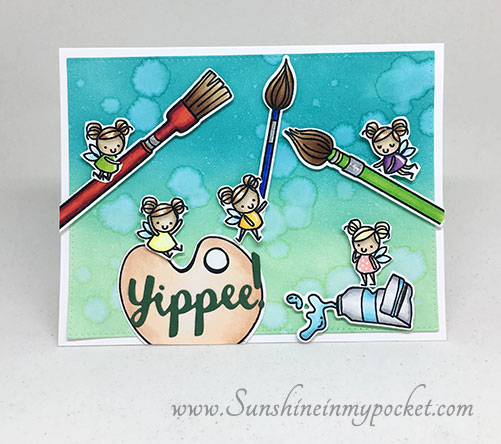
Here I use some of my very favorite recent sets to create this fun scene:
I used distress Oxides in the background and created some big water drops. I don’t usually add those water drops, but I felt like this card called for it!
The little fairies are from The Greeting Farm, and the paintbrushes are from Waffle Flower. Aren’t they the cutest? I do not have the dies for those fairies, so I just fussy cut them. I colored all the images with Copic markers. The Yippee sentiment can be found here.
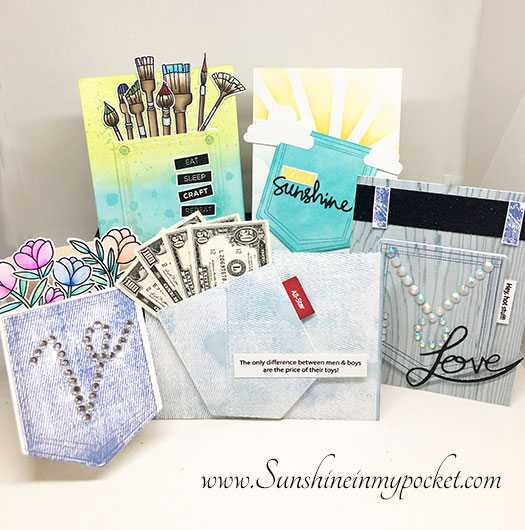
Hello! Today I couldn’t stop making pocket cards with the June 2018 Hedgehog Hollow box! I made 5 cards to share today. Yes, FIVE! I just kept on going (and I still have a dozen more ideas for this versatile box)! Even though this is a masculine themed box, there is still potential for feminine cards, too.
Affiliate links are used when possible, when you click on these links and purchase a product, I will receive a small commission. These help to pay for my blog and crafty news that I bring to you! Thank you for your love and support.
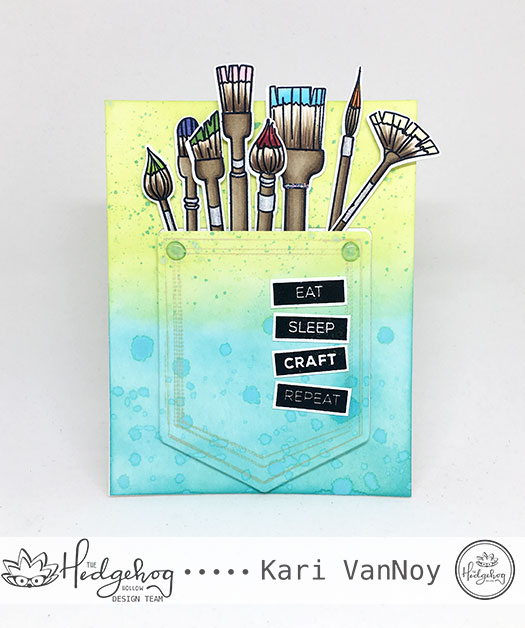
The first one could be for any crafty friend, and I splattered it with a little paint and added some paintbrushes from my stash.
I used Distress Oxides in Peacock Feathers and Twisted Citron to ink up a card panel before cutting out the pocket die. Then I added my brushes and popped it all up using my favorite Scotch 3M foam tape. I added a sentiment that says “Eat. Sleep. Craft. Repeat.”
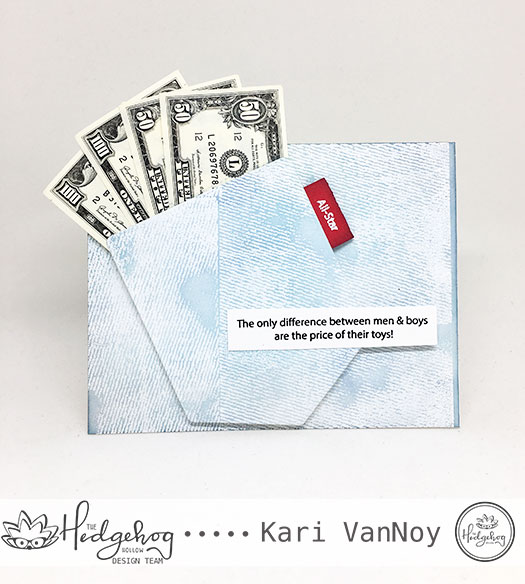
The next card I made just HAD to have some money sticking out of it. Because after all, what do you put in your pocket? My favorite is when I put a twenty dollar bill in my pocket and forget about it…then I find it when I wear those pants again! (do you ever do that, is it just me?)
I used the sentiments from the Hedgehog Hollow stamp sets in the June box: “The only difference between men & boys are the price of their toys!” Then I used “all-star” as a red tag on that pocket….to kind of resemble the “Levis” tag on a pair of jeans. Believe it or not, I FOUND this paper money just floating around in my craft room. Perfect!
Here I just inked up the background with a little Distress Oxide in Faded Jeans, then I stamped on the denim stamp with the same Distress Oxide ink. So easy, but it adds a lot of texture!
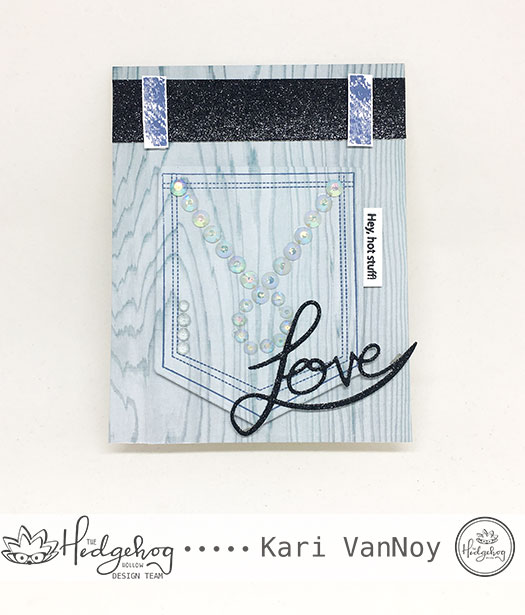
My next card had to be a pocket with BLING!!
So I created a pattern with some gemstones on the pocket. The woodgrain paper was also in the box. Who ever heard of wood grain pants?! But I kinda liked the look, so I went with it. I created a glittery belt out of black glitter paper and added some “belt loops” with the stamp set. The “Love” die is from this set and is a part of the Crafting for a Cure bundle to raise money for the Akron Children’s hospital. (I love that Alexandra did this set!)
For the tag on the side of this pocket, I used “hey hot stuff!” and I think it works perfectly for a girl card.
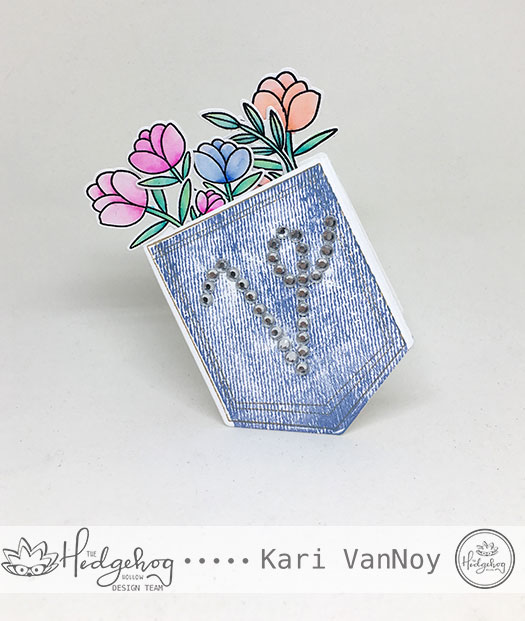
Now, I just couldn’t go on until I made a pocket SHAPED card! Again, I used gem stones for the pocket. But this time I cut the pocket out and left the top portion over the fold in the card, so it created a POCKET SHAPED card! So cool.
I added some flowers that I had colored up with my Zigs, then I covered the back of the card with another pocket die to hide the glue. On the inside it says “Sending Joy.” (see the video for a better look)
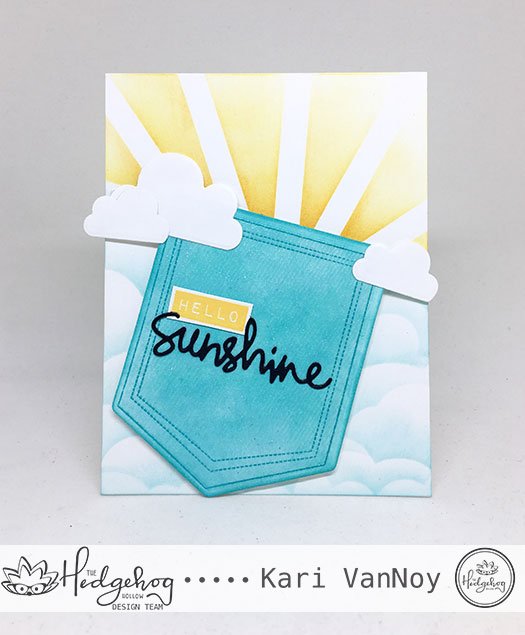
Now, for my last card, you just KNOW I had to make a Sunshine in My Pocket card! I mean, c’mon…it’s the name of my BLOG!
The sentiment says “Hello, Sunshine” and I used some products from my stash to create it. I taped off the sunshine coming out of the pocket with post-it, then I used Distress Ink in Mustard Seed and Wild Honey to ink on those sun rays! The pocket is inked up with Distress Oxide in Peacock Feathers, then I used the denim stamp with Versamark and added clear embossing powder for texture.
Check out my video for more details here or on YouTube:
I hope you had as much fun as me and got some inspiration for your own pocket cards! Here’s one more look at them all together!
Hi I'm Kari. I'm a creator, a card maker, and a day maker! I am Lucky in love to a supportive husband, blessed to raise 3 kids (all moved away now!), and happy to be watched over by 2 dogs.
I originally started this blog to remind me to be happy amid adversity, and I hope it inspires you, too!