Archive | Cooking Light RSS feed for this section
SUNSHINE-all-three-cards-different-layers

Sushi Cards!

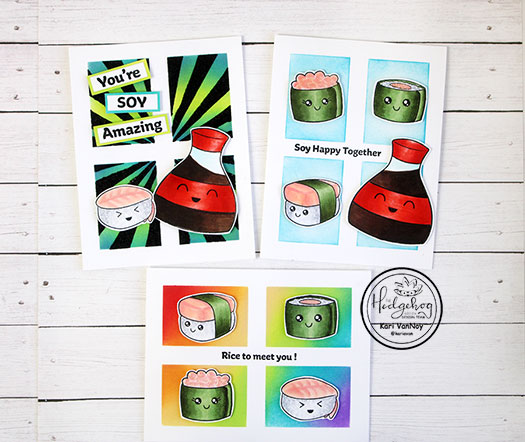
Hello! Today I am here to share some fun sushi cards with a few favorite stenciling techniques. Have you ever struggled to create a scene card? Well, here are some easy techniques to make your cards shine!

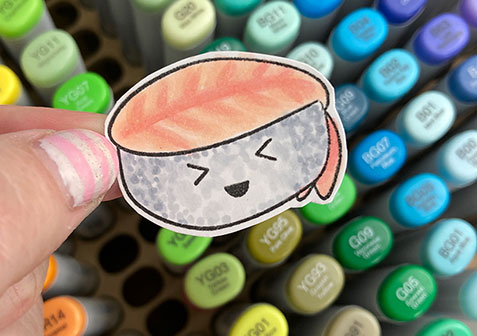
I had so much fun coloring up these images. I added some extra details where I thought it was needed: like the lines on the shrimp, and the lines on the salmon wrap (which turned out a little looking like a pink eraser! Lol). But these details are fun and give so much extra interest.

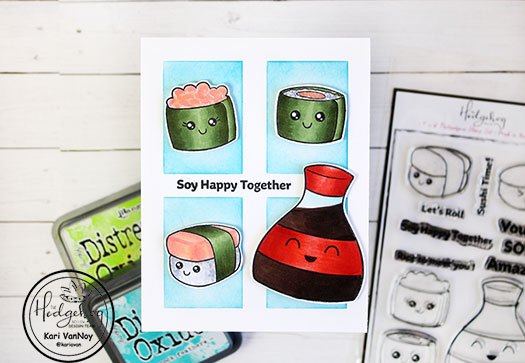
For the rice, I used Cool Greys to dot the color on…to give it a feeling of rice granules.

Watch the video below or in HD on YouTube:

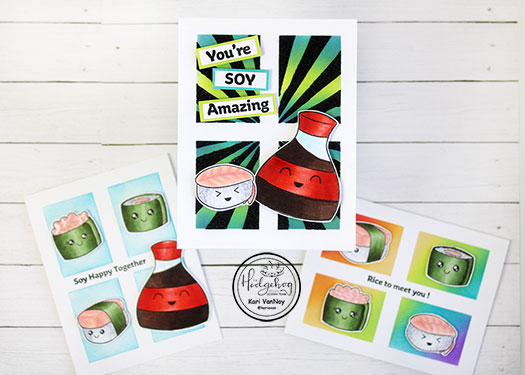
I’m using a simple window stencil on all three cards, then on the black glitter rays I used a DOUBLE stencil technique. (It’s sooooo easy, and yet it’s still one of my favorites!)

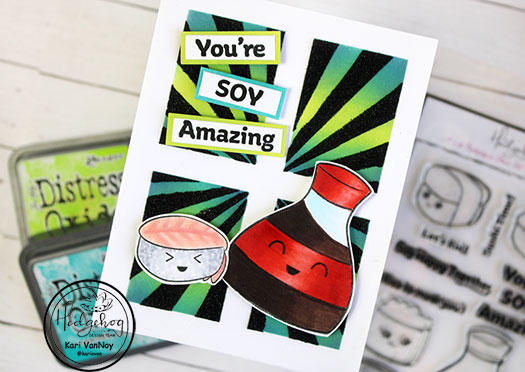
You may have noticed that for the way I positioned my soy sauce, I colored the liquid in the wrong direction! But most people won’t notice, and so I say JUST HAVE FUN with your coloring and don’t worry about the way it lands or the light source. You have plenty of time to worry about that later on…

I love the rainbow inking in a diagonal direction on this one. I think any way you ink the background will look adorable with these sushi characters. I mean, they are just so cute!

I’m often asked what supplies I use to make my cards and projects, so I’ve put together a list using affiliate links when possible. If you make a purchase with these links I may receive a small commission. These help me to keep up with blog costs and continue bringing you fun projects. Thank you so much for your support!

I added glossy accents to the caviar and the California roll (or is it a Vegas Roll? Who knows….) and it catches the light and adds another element of fun.

I hope you enjoyed these sushi cards today! I don’t normally enjoy sushi, but I do LOVE them on a card! Lol. See you soon!

Comments { 0 }
last-mango-salsa-pict

Peach Mango Salsa (for Salad or chicken!)

Today I am sharing my favorite Peach Mango Salsa recipe. It is delicious with chicken or on salad…and I serve it a lot with a simple grilled chicken over a bed of greens. It is so easy to make and adds a big flavor punch!

peach-mango-salsa

I don’t know what it is about this salsa that makes me want to break out into a latin dance every time I make it! Ha! But really, doesn’t this picture just make you happy?!

I use a special tool to cut all the pieces into the perfect little dice, and it makes this job SO FAST. It’s called a food chopper, and I got mine for such a deal at Bed, Bath & Beyond. (I don’t get paid to tell you this…I am only telling you because I LOVE this tool so much, and I use it for this peach mango salsa, fresh bruschetta, and my garden salsa ALL the time!)

the-ingredients

Here’s the beautiful ingredients that go into the Peach Mango Salsa. First, chop up the onion and pepper using the small grid:

chop-the-onion-and-pepper

See how small and perfect each little piece is? That would take FOREVER if you did it by hand…unless, of course, you are a super-fast knife chopping sous chef, maybe.  You can see a picture of the chopper there…it’s formal name is “Vidalia food chopper.”

Then, chop up the tomatoes, peach, and mango using the large grid:

chop-tomatoes-mangoes-peaches

I usually also add something green like a green pepper or a jalapeno from the garden. The jalapeno gives it a little kick, which is fun sometimes. Today I used a small green pepper. I cut them into half…or just small enough to fit on the chopper and then let the tool do the rest of the work.

Next, squeeze the lime over the salsa. Here’s another tool that I love:

squeeze-the-lime

Have you ever used one of these juicers? You put the cut side down over those holes, then squeeze the handles together. Pretty easy. Now, sometimes if the fruit is a bit too tart, I will add a teaspoon or so of sugar over the salsa and mix it all up. Today I didn’t add any sugar. Those Utah peaches are divine!

Here’s the complete recipe:

[amd-zlrecipe-recipe:15]

mango-chicken-salad

So here’s a chicken salad I added the Peach Mango salsa to. It adds so much flavor!

chicken-with-mango-salsa

It’s also delicious with chicken. Or Salmon tacos. Or chicken tacos.

last-mango-salsa-pict

Or just dive in with some chips! I hope you enjoyed our fresh ingredients turned into a tangy, sweet salsa today.

Comments { 3 }
enjoy-peaches

Dose of Sunshine — Life’s just peachy

Welcome to PEACH WEEK at Sunshine In My Pocket! Take a look at these beautiful peaches that came in from Utah:

box-o-peaches

How’s this for some SUNSHINE for you? I am always inspired by vegetables and fruits. I love farmer’s markets. And this little gem of a peach is going to turn in some tasty treats!

{The first thing I did when I got these peaches is cut up a fresh one and eat it with some Greek Honey yogurt. Delicious!}

Come back all this week to see what peachy recipes I’ve got to share with you…and then share some of your own. See you soon!

enjoy-peaches

Comments { 0 }
really-bright-hummus

Taste Test Tuesday — Hummus 3 ways

hummus-3-ways

Taste Test Tuesday is back! Starting with a fun experiment with hummus.
I have never made hummus before, but I’ve always wanted to. Luckily, the famous (infamous?) Casey Conrad (fitness and health guru) was here for a few days and she whipped up a batch of hummus! She divided it into thirds, added garlic to one part, spinach to another and shredded BEETS to another!

Just look at that bright pink color! I love beets in my Hot Pink Breakfast Drink so I thought it sounded perfectly reasonable to add it to some hummus. 🙂

Now, a quick note on the Sesame Tahini that is required to make hummus. I always thought it came in a squeezable tube…which is perhaps why I haven’t been able to FIND it in the store. It actually comes in an orange and brown can with a lid. Casey instructed me to look near the jam at the health food store, and sure enough, that’s right where I found it!

hummus-2

Hummus is surprisingly easy to make with a food processor. Just throw the basic ingredients in (garbanzo beans, tahini, olive oil, lemon juice, garlic, salt), mix it up, add your flavor choices and VOILA! Homemade Hummus. As I work out my favorite hummus recipe, I will be back to share it with you!

And now for the taste test RESULTS:
it was completely divided! Some liked the spinach the best, some liked beets, and some liked the garlic! I personally, liked them all, but I have to say the garlic won me over.

So try adding some different veggies to your next batch of hummus and let me know if YOU find a winner.

Do you have a favorite hummus recipe? Let me know in the comments below.

Be sure to come back this week, when I will share a Gluten-Free & Vegetarian Chocolate Cake that is actually delicious! Casey taught me just how to make it…and you will be surprised at one of the main ingredients!

really-bright-hummus

Until then,

Comments { 2 }
grilled-peach-salad-3

Grilled Peach Salad with Caramelized Onions and Homemade Croutons

Our peaches from Utah finally came in this week! Yes, I am very excited to make all things peaches! When you think of recipes with peaches, what do you think of?

I think peach pie, peach jam, peach cobbler…you know, desserts.  But today I have an unexpected TREAT for you: My favorite salad with GRILLED PEACHES!

grilled-peach-salad

It’s my Grilled Peach Salad with Caramelized Onions and Homemade Croutons.

This salad is fantastic. It’s the only salad that I DON’T put salad dressing on…it doesn’t need it! (Ok, ok, if you need salad dressing try a light balsamic or Olive Garden Italian dressing. Those are delish on this salad. Also a Peach Balsamic is fantastic with this.)

First, prepare the caramelized onion. Slice an onion (I use a yellow onion, or Vidalia if you can find them). Heat some olive oil (about 1 T.) in a skillet. Add the onion and cook low and slow until the onions are soft and caramel colored. Stir occasionally. This will take some time…but it’s worth it!

While the onions are cooking away, prepare the croutons. Slice some bread into bite-sized pieces. I like to use sourdough bread or rosemary olive oil bread. Spritz the bread with olive oil and toss. Sprinkle lightly with garlic salt. Broil in the oven for a minute or two, until they are lightly browned and crunchy. Keep an eye on these while in the oven…they cook fast!

Now, prepare the veggies. Wash and dry the lettuce. Romaine and Green leaf lettuce are the best for this salad. Tear the lettuce into bite size pieces. Slice some fresh tomatoes. Shred some cheddar cheese.

By this time, the onions should be just about ready. Now, just slide those over a bit so you can grill the peaches. Take your peaches and cut them in half, remove the pit. Place them cut-side down in the pan with the onions (add a drizzle of olive oil if it needs it). Let those brown up just a bit…about 2 minutes. {Note: you can grill them on your outdoor grill or use an indoor grill pan if you have it.}

Now build your salad and ENJOY!

grilled-peach-salad-2

Lettuce, tomato, caramelized onions, shredded cheddar, grilled peaches; This salad is layered with flavor…don’t forget to add your croutons!

This is one of those dishes you can feel good about eating. It tastes good AND it’s nice and light. I wish I had one right now.

grilled-peach-salad-3

You can expect a few more peach goodies from me soon! Oh yeah.

Comments { 0 }