Archive | May, 2017
nuvo-mousse-mine-mine-mine

Nuvo Mousse Sea (Sparkle & Shine: Day 5)

I couldn’t resist this Seagull stamp set from MFT Stamps. So I thought it would be the perfect time to try them out with a Nuvo Mousse sea made with a stencil!

I learned about Nuvo Mousse and how to use it from Online Card Classes: Sparkle & Shine. I had already purchased some in Sea Foam green and was waiting for just the right time to use it. Enter Day 5: Paste & Mousse.

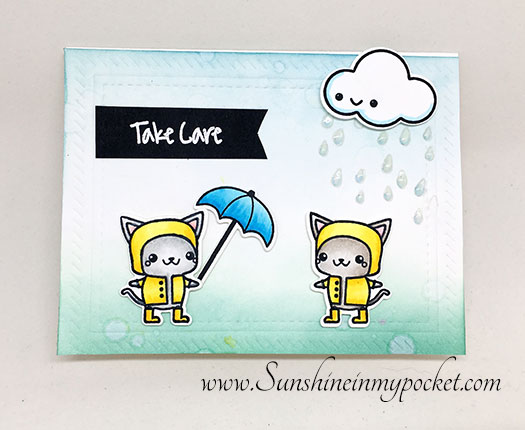
Here is my card. The Nuvo Mousse has a little shiny sheen to it when you hold it in the right light. And look closely, because I added a little “glitter foam” to the top of the waves for even more sparkle! (Can you ever have too much sparkle?) I did this using a VersaMark Pen, then sticky embossing powder, then distress glitter in Clear Rock Candy. Can you believe I have never used sticky embossing powder before this class? It’s a tragedy! I love this stuff!

nuvo-mousse-mine-mine-mine

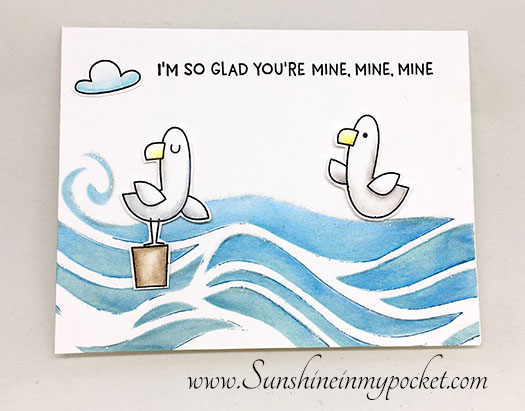
I love Seagulls. They are great for coloring…so easy! I just added a little gray and some yellow/orange for the beaks. The sentiment makes me smile, too. I imagine the seagulls fighting over the fish…saying “mine, mine, mine, mine!” Lol.

I wish you could see the shimmer better. But real life is always more glittery, I guess. 🙂

Here’s a List of supplies I used:
(affiliate links used where possible, at no extra cost to you)


Comments { 0 }
glitter-paste-background

Glitter Paste Background (Sparkle & Shine: Day 5)

Kristina Werner inspired me in her class on Glitter paste in the Online Card Classes: Sparkle & Shine. I loved how she made the transition in colors of glitter pastes. So I thought I’d give it a try.

Lucky for me, I already had 3 colors of glitter paste by Bo Bunny. Here’s the background I came up with using a stencil:

glitter-paste-background

Since it was just Mother’s Day, I thought I’d make it into a card for Mom. I like how the transition of color turned out. This card is sure sparkly in real life! That glitter paste is something special. The flower die is from Penny Black, the letters are from Lawn Fawn, and the sentiment is from Hero Arts.

I’m really enjoying this class and I wish it could go on longer! Hope you enjoy my card.

Comments { 0 }
perfect-pearls-and-glittery-butterfly

Perfect Pearls Background (Sparkle & Shine: Day 4)

Confession: This is the first time I have ever used Perfect Pearls. I got a couple colors to try out just for this Online Card Class, Sparkle & Shine.

I used a stencil to cover the paper, then added VersaMark ink. Then I applied Perfect Pearls with a paintbrush. Wow! The background turned out so pearlized and shiny.

perfect-pearls-and-glittery-butterfly

The butterfly (from Waffle Flower’s new Summer Release) is such a fun one…each part is separate so you can stamp with different colors of ink. So I used three different colors of distress ink, and spread the color using a water brush. Then I stamped over the entire image with VersaMark, added sticky embossing powder, and then glitter. Wow again! This glitter tile over the top of an image was from another technique taught by Julie Ebersole.

So much fun. I’m looking forward to re-visiting these techniques again and again.

Comments { 0 }
rain-liquid-applications

Adding Liquid Sunshine/Rain (Sparkle & Shine: Day 3)

In Day 3 Online Card Classes: Sparkle & Shine, we learned more about liquid applications. One of the classes taught us about making rain and raindrops on our project. I was intrigued by adding colored pencil to the raindrop, then adding glossy accents to the rain. I tried that technique on my project here:

rain-liquid-applications

I colored in the bottom of each raindrop with a bright blue colored pencil, and added some gray too. Then I topped them all off with glossy accents. It is dimensional and glossy in real life, and looks like great rain!

I’m looking forward to finding some Pico Embellisher to making long raindrops on a card…that will be my next challenge.

Another great day of classes! Thank you, Jennifer & Kristina!

Comments { 0 }
foiled-thanks

Adding Foil to a Sentiment (Sparkle & Shine: Day 2)

I love the idea of adding foil to my cards! So when I saw that Day 2 was all about foiling I was very excited! But then I found that, while I had a lot of foil in my collection, I didn’t have a lot of WAYS to add my foil to my projects. But I did have Scor-Tape and that will work for now.

Here’s my card, where I added foil to my sentiment and to some of the polka dots.

foiled-thanks

I used sparkle embossing powder on the stamps…it’s a fun look in real life, but tough to photograph! The stamps and dies are from Essentials by Ellen Hutson. I hope you enjoy.

Comments { 0 }